
My photographer went awol but there is a photoshoot planned tomorrow/wednesday, so makeup tutorials coming back soon yea..
I always hated doing photoshop tutorials cuz they are so freaking long and they needed alot of screencaptures.. but I cooked this one up just for yall!! Hehe...
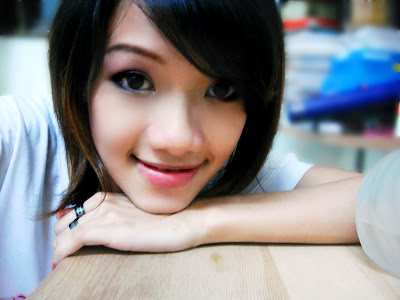
Transform yourself from this:
to this:

to this:

 STEP 2 : DO THE CURVES TUTORIAL
Adjust the contrast and brightness of the photo to make yourself fairer!
Click on the link above for the tutorial, if you did it before and still remember how to do it.. *clap clap*
 STEP 3 : REMOVE PIMPLES/WRINKLES/EYEBAGS
Take away all your face's defects. No doctor required.
Once again, click on the link if you have forgotten how to do it.


STEP 5 : DARKEN THE SHADOWS!
1. Click on the tool in number 1, hold your mouse button.
2. Choose the Burn tool.
3. Change the range to Shadows(so you only darken your shadows) and the exposure to 30%(you don't want it too dark)
4. Adjust the size of the tool by pressing [ or ]
Paint on the red areas, darkening your brows, eyes and mouth gap areas effectively.
 tada!
tada!
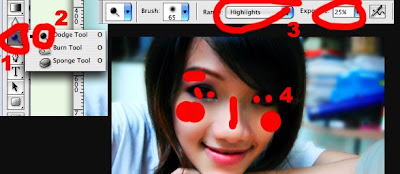 STEP 6 : HIGHLIGHT THE WHITES!
1. Click on the tool
2. Choose the Dodge tool
3. Change the range to Highlight(so you only affect the highlighted areas) and the exposure to 25%(you don't wanna shine too bright)
4. Change the brush size by clicking [ or ] ..Keep this in mind k..
Paint over the cheeks, nose bridge and your brow bones.
1. Click on the tool in number 1, hold your mouse button.
2. Choose the Burn tool.
3. Change the range to Shadows(so you only darken your shadows) and the exposure to 30%(you don't want it too dark)
4. Adjust the size of the tool by pressing [ or ]
Paint on the red areas, darkening your brows, eyes and mouth gap areas effectively.
 tada!
tada! STEP 6 : HIGHLIGHT THE WHITES!
1. Click on the tool
2. Choose the Dodge tool
3. Change the range to Highlight(so you only affect the highlighted areas) and the exposure to 25%(you don't wanna shine too bright)
4. Change the brush size by clicking [ or ] ..Keep this in mind k..
Paint over the cheeks, nose bridge and your brow bones.
 There you go, virtual sculpting and contouring using Burn and Dodge tool!
Now your face won't look so flat!
 STEP 7 : FACE SURGERY
1. Filter > Liquify
 2. Pick the first tool on the left (it pushes and pulls)
3. Push all the areas in the direction showed.
Aim for stronger jawline, V shaped and smaller nose, defined lips, higher cheekbones and higher brows!
Imagine you can plastic surgery yourself and go crazy!
 4. Pick the Bloat tool. (It enlarges stuff, the tool above makes things smaller)
5. Click ONCE on your eyes, you don't wanna look like a goldfish.. haha
 Face surgery done!
Smaller nose, cuter lips and more defined bone structure. Oh, and bigger Japanese eyes!
 STEP 8 : COLORED CONTACT LENSES
1. Click on the Brush tool, remember this tool!
2. Click on the Brush type
4. Click on the little arrow
5. Hit Load Brushes
6. Load all 3 of the secret weapons : Eyelashes and contacts
7. You will be able to see all your new brushes in your brush type list now!
 1. Click on the Brush type
2. Choose the contacts you like.. I chose the one shown.
3. Hit New Layer icon(so that you don't mess up your original photo)
4. Click on your new layer
 5.Click on the color swatch, change it to the color you want your contacts to be.
6. Adjust the size using [ and ] to fit your irises.
7. Click once! Look at the result at the picture above this one labeled 5.
 1. Change the blending mode to Color Dodge so that your contacts lighten your iris, use Multiply if you wanna darken your irises.
2. Result shown with arrow.
 1. As the effect is not that obvious (for my photo, skip this if you are happy with the result)
Right click on your layer and duplicate the layer
Hit ok.
Do this as many times and you think is neccesary.
For each layer, play with the blending modes until you get the effect that you are looking for, you can drag the layers below or on top of one another.
 1. At the end of your playtime, click on the lowest contacts layer.
Hold shift and click the one right on top.
This selects ALL your contact layers.
Hit CTRL G to group them.
 Oops! I mislabeled..
Number 2 first : Hit the mask tool
1 : Click on the mask
3. Get your brush tool and click on the one above.
Change the color to black.When you try to paint over your contacts, you will notice that black act as an eraser and white act as the opposite.
Paint over all the contacts area that flood out of your irises area, for example your eyelids and such so that the contacts only apply to your irises and nowhere else.
 STEP 9 : FAKE LASHES
1. Click on your contacts group to select them
2. Hit New Layer icon.
3. Select your newest layer by clicking on them!
 1. Click on the brush tool
2. Choose your fave pair of lashes.
3. Adjust the size accordingly using [ and ], pick a colour you like.
4. Click on your lashes.
5. If you want, you can put lower lashes too, I chose the one shown above
6. Click on the photo to get your new lashes!
 If the colour is too intense, turn the opacity down until you feel comfortable with the result!
 STEP 10 : BLUSHER
1. Make yet another layer
2. Select your new layer by clicking on them
3. Select the colour swatch so that you can change the colour
4. Pick the hue that you want (greens or reds or yellows or blues)
5. Click on the colour that you want.
 1. Get your brush tool, use the soft brush
2. Adjust the size until it fits your cheek.
3. Click!
 1. Set the layer blending mode to Color
2. Play with the opacity until you fade it to your desired tone.
 STEP 11: HAIR HIGHLIGHTS
So now you have your contacts layers, lashes layer and blusher layer.
We are gonna add one more, so make another new layer.
 By now you should be familiar with the brush and color picking..
1. Choose the brush tool
2. Pick the colour you want your hair to be.
3. Paint your hair!
 Set the layer's blending mode to Soft Light.
If you feel that it isn't doing anything, duplicate the layer.
Too much? Turn the opacity down.
Finish!!!Now if only I can photoshop myself and then bring that photoshopped photo to the plastic surgeon......
photoshop makeover makeup digital editing


